Order a copy of Keeper Recipes. PDF format or MS Word. $10.00
Featured Post
Best Homemade Dog Shampoo: All Natural Oatmeal Dog Shampoo
I found this DIY dog shampoo at this link. Within the post is a link to her homemade flea shampoo. https://www.freebiefindingmom.com/b...

Monday, September 30, 2013
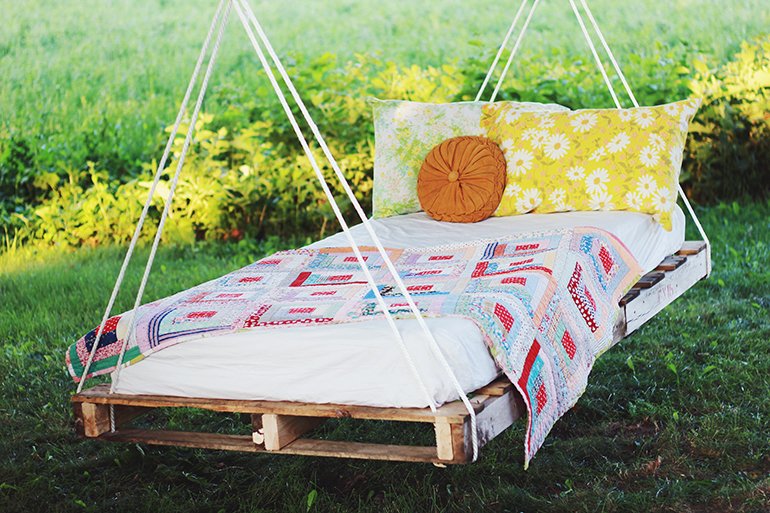
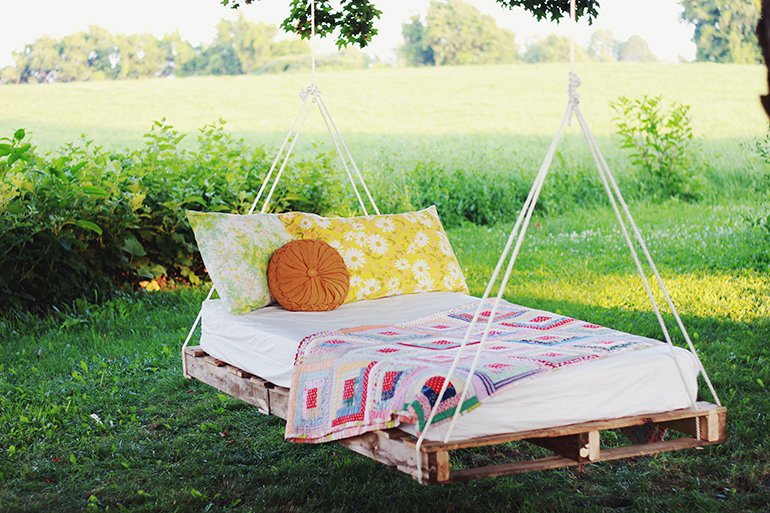
DIY PALLET SWING BED
http://themerrythought.com/diy/diy-pallet-swing-bed/
DIY PALLET SWING BED
55 Replies
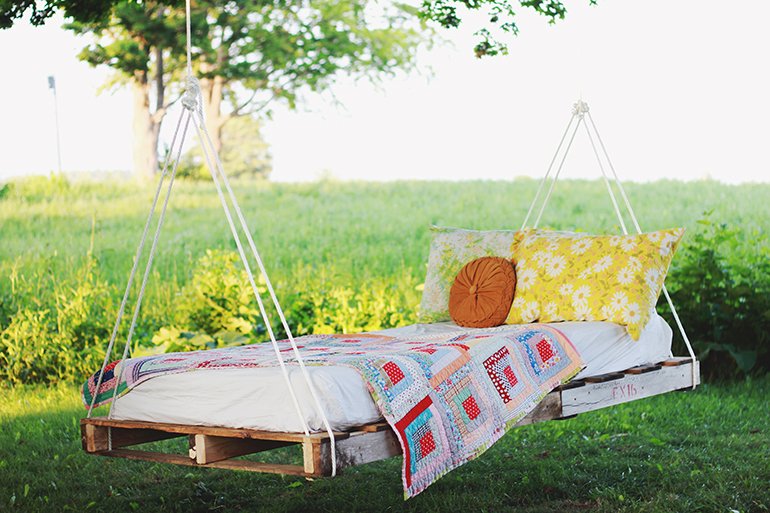
Oh the endless things you can do with pallets! A swing bed has been on my “Mike To-Make List” for some time (oh how long that list is!
Swinging has to be my all time favorite childhood activity. And swinging while laying down? A lazy girl’s dream come true! And how dreamy this bed is. I could easily spend my days here, swinging the summer away. (That’s definitely wishful thinking! Even though it looks like that’s what I do in these pictures, Caitlin took these photos after the boys were in bed. The only time we seem to be able to get anything done!)
There are a number of ways you can make these swing beds. They can be as simple as just using a pallet and rope. This DIY is for the specific way we made ours, which was to fit a twin size mattress. It still was a very simple and quick project, even with a few extra steps.
What you’ll need:
- pallets
- 2 x 4 lumber (we used three 8-foot pieces)
- drill
- screws
- saw
- measuring tape
- rope
- mattress or cushion (we used a standard twin mattress)
- 2 vinyl zippered mattress covers*
How to do it:
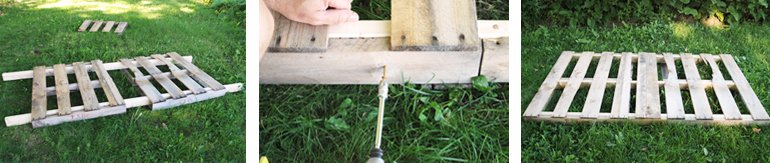
- Measure the size of the mattress or cushion you’re putting on the pallet and figure out how many pallets you’ll need to use to fit your mattress on. We used 2 pallets and added additional pieces in the middle to get the right length for ours. (We added 12 inches to the middle. The total length of our pallet was 80 inches.) Take into account the space you’ll need for the rope at the ends.
- Slide the 2 x 4′s through the inside of the pallets, one on each inside edge of the pallet and one through the middle.
- Screw the 2 x 4′s to the sides and middle of the pallet.
- If needed, add additional boards from another pallet to your main piece, we added two boards from a broken down pallet to the middle of ours.
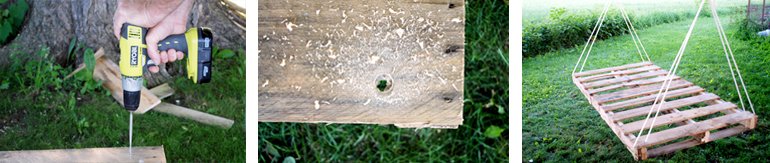
- Cut off 2 x 4′s that are hanging past the length of the pallets.
- Drill holes in the four corners of the pallet, both the top and bottom boards of the pallet. Make sure the hole is big enough for the rope to fit through.
- Thread the rope through the hole, making sure rope goes under the bottom of the pallet and around the 2×4 (see picture below). Tie securely.
- Tie rope securely to tree.
- Enclose mattress in vinyl covers. Place on top of swing.
*Not necessary, but will keep your mattress dry & protected
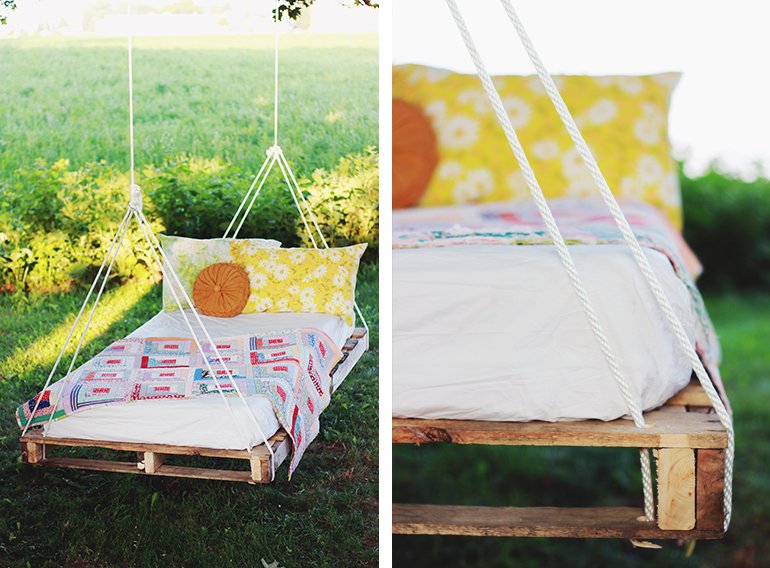
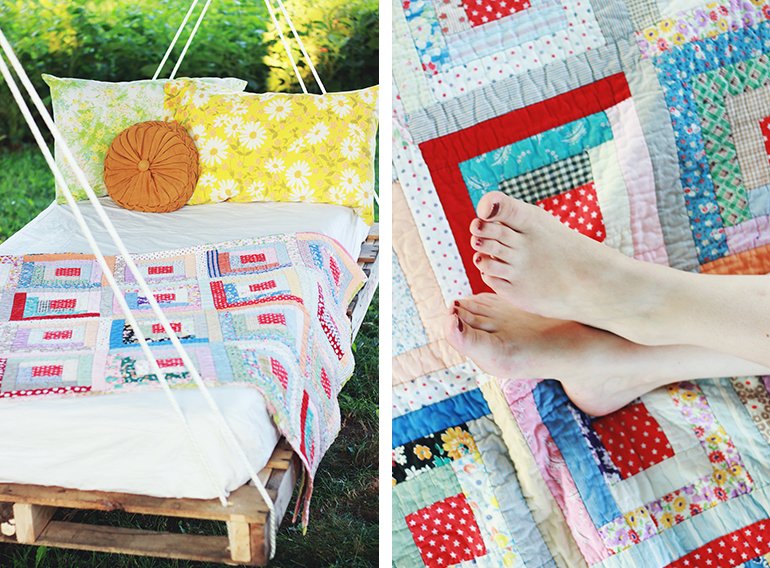
We also covered our mattress with 2 vinyl zippered mattress covers to protect it from moisture and bugs. Ugh – these bugs. I think I’ll actually enjoy using this swing more come fall – with cooler air and less bugs around! (And while we’re talking about summer, I’ll just mention that I realize I have dirty feet in these pictures…I like to refer to them as “summer feet”. Cause I run around in sandals or barefoot all summer.).


We also covered our mattress with 2 vinyl zippered mattress covers to protect it from moisture and bugs. Ugh – these bugs. I think I’ll actually enjoy using this swing more come fall – with cooler air and less bugs around! (And while we’re talking about summer, I’ll just mention that I realize I have dirty feet in these pictures…I like to refer to them as “summer feet”. Cause I run around in sandals or barefoot all summer.).
Sunday, September 29, 2013
Thursday, September 26, 2013


![Easy Upholstery Stain Remover! Got some nasty stains in your car from kids and accidents? Here’s a home-made remedy that will get your car clean without a huge bill!
In a car, vacuum the seats thoroughly and picked any crusty or sticky substances from the upholstery surface. Mix 1 cup each of Dawn Dish Soap, white vinegar, and club soda together in my heavy duty spray bottle and shake lightly. Liberally spray the stained areas and let it sit for 5-10 minutes. Take a scrub brush and scrub in little circles over the stains.
SHARE to save to your timeline Join @[571782792865060:69:We've Got the Skinny] for more great tips, recipes and MORE](https://scontent-b-dfw.xx.fbcdn.net/hphotos-prn2/p261x260/1239490_10151583839660824_1645778060_n.jpg)
Wednesday, September 25, 2013

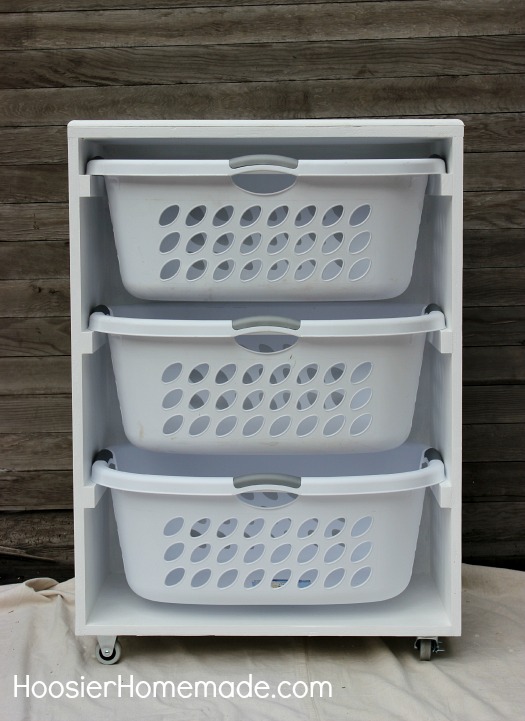
DIY Mobile Laundry Station
http://hoosierhomemade.com/diy-mobile-laundry-station/
Laundry – the never ending task! Seems like no matter how many times we try to get caught up, the pile of laundry just keeps multiplying!
What if you had an area that would keep all your laundry and the supplies organized? And even if you had laundry, there would be a spot to keep it all.
As part of the Brilliant HE Clean Ideas Bloggers, we were challenged to create a solution for our Laundry Room. Jenny Komenda shares her top 6 tips for Laundry Room Redesign, like Tip #4 - ”A rolling laundry butler can be your best friend, doing triple duty with a hanging bar, a rolling basket and a drying rack.”
We took the rolling laundry butler a step further and created an organizing station that holds laundry baskets and a place on top to hold soap, stain remover and dryer sheets and created a Mobile Laundry Station.
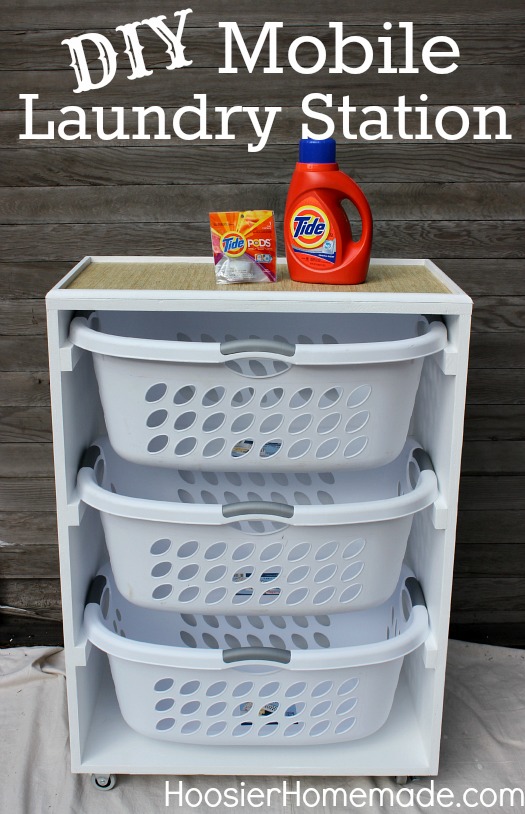
Isn’t she a beauty? Doug did a fantastic job on it. But it’s actually not for me – I will have to confess, I don’t do the laundry in our house. Yes, I’m very lucky to have my hubby do our laundry.
To get you started on your own Laundry Room project, Tide, Maytag and The Home Depot have teamed up to bring you an AMAZING Giveaway! Enter to win a $500 Home Depot Gift Card! Yes – you heard that right! One lucky Hoosier Homemade reader will win! So ENTER!
We have lots to show you how to build this Mobile Laundry Station – so let’s get busy…
First let’s gather our supplies -
Mobile Laundry Station Supply List
- 4 x 8 foot sheet – 3/4 inch plywood
- 2 – 6 foot 1 x 2 inch pine boards
- 4 x 4 foot sheet – 1/4 inch plywood
- 8 foot – 1/2 inch x 3/4 inch shoe molding
- 2 – 2 inch medium duty swivel casters with brake
- 2 – 2 inch medium duty rigid casters
- Deck screws - 8 gauge by 1 1/4 inch
- Wood screws – 8 gauge by 3/4 inch
- Wood Glue
- Primer
- Paint
- Shelf Liner
Cut List
The measurements will depend greatly on the size of your laundry basket. We used 1.25 bushel Sterilite brand. It’s best to have the employees at The Home Depot cut the 3/4 inch plywood into 15 1/2 inch width pieces for you.
For the box – 3/4 inch plywood
- 1 – 15 1/2 inch x 26 inch (top)
- 1 – 15 1/2 inch x 27 inch (bottom)
- 2 – 15 1/2 inch x 36 inch (sides)
For the back – 1/4 inch plywood
- 27 3/8 inch x 35 3/4 inch
For the rails – 1×2 inch pine boards – the rails will be attached to each side once the box is built, at 10 inches from the bottom, then 21 inches from the bottom and 32 inches from the bottom. Spacing will depend on the size of your laundry basket.
- 6 – 15 1/2 inch long
For the top – Shoe Molding (ends cut at 45 degree angles)
- 2 – 27 1/2 inch pieces
- 2 – 15 1/2 inch pieces
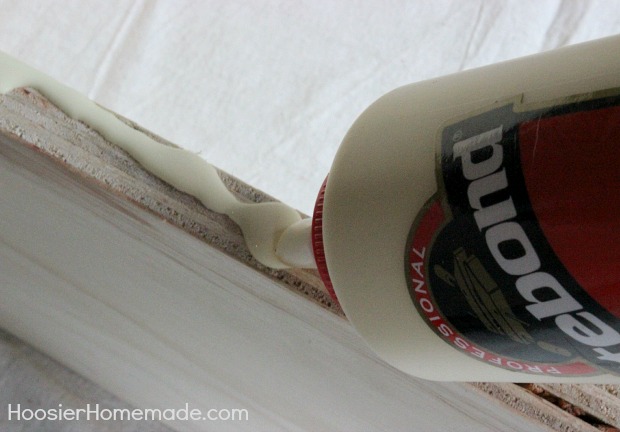
The construction is a simple box, with 1×2 inch pieces of wood to hold the laundry baskets. After cutting the pieces of wood, it’s best to apply wood glue to the joints before screwing them together.
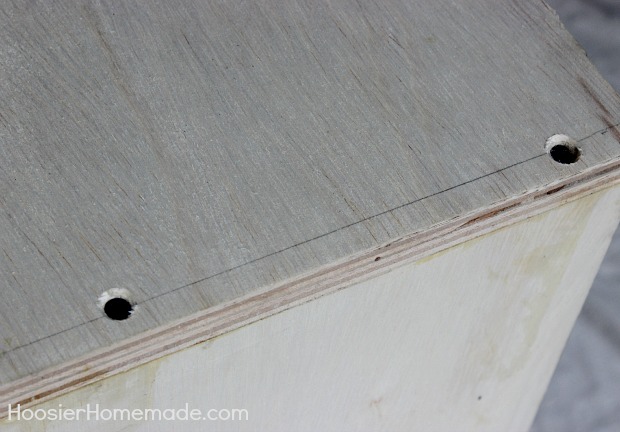
Pre-drill the screw holes with a small drill bit and countersink the holes for a clean finish. After glue is set and prior to painting, cover the screw heads with wood putty.
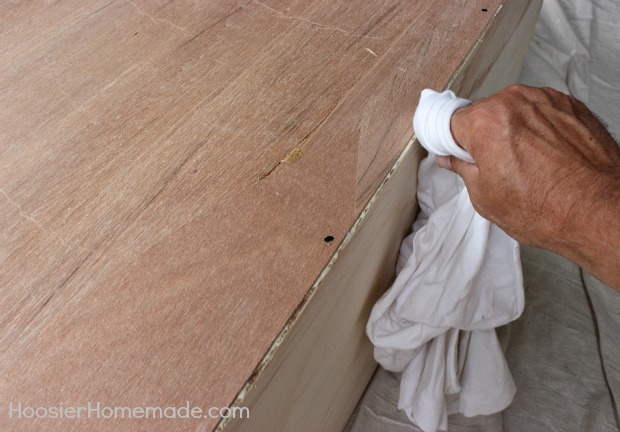
After you have built the sides of the box and attached the back, make sure to clean up any wood glue that has squeezed out of the joints with a clean wet rag.
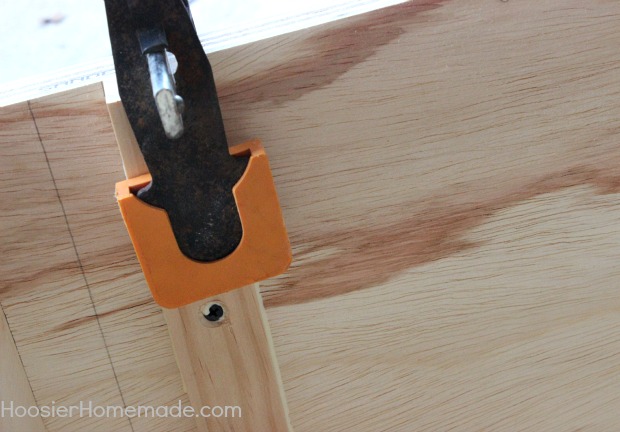
Now it’s time to build the rails that will hold the laundry baskets. Attach the rails to the inside of the box, use the supply list as a guide for spacing the rails. Use a clamp to help hold the rails in place while you glue and screw them to the side. Leave the clamps on until the glue has dried.
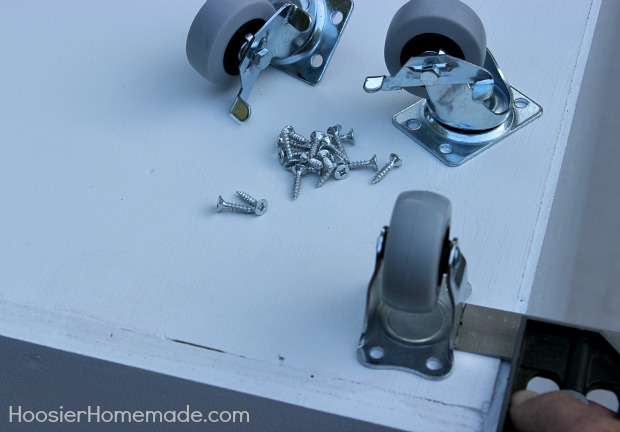
After the laundry station has been primed and painted, you can add wheels to the bottom if you like. Space the wheels 1 inch in from the corners.
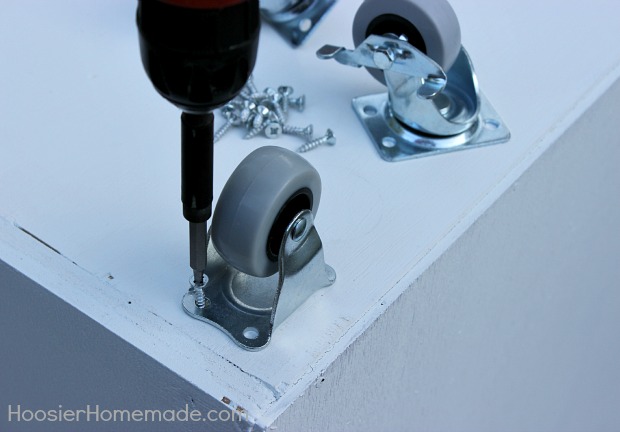
And attach them with the 3/4 inch wood screws.
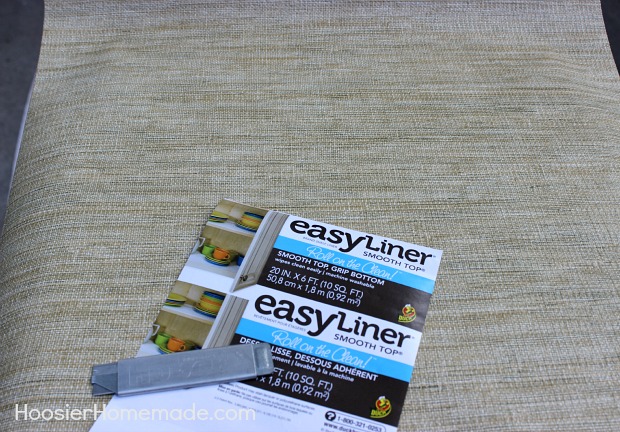
To make clean up easy, we added shelf liner to the top. This Duck Brand easy liner is sold in a roll and can be cut to fit the top. Secure with staples around the outer edge.

To finish the top, attach wood trim around the edge with finishing nails. This trim can also be glued, but we chose to nail it so it could be removed if the liner needed to be replaced.
Tuesday, September 24, 2013

No Sew Halloween Spiderweb Cape
http://www.deliacreates.com/2013/09/no-sew-halloween-spiderweb-cape-tutorial.html

With October just around the corner, I'm sharing a Halloween costume tutorial today for


 Tip 3: As a general rule, a small child's neckline radius is about 2 inches and an adult's is about 3 inches.


It's really easy and completely no-sew!

It's versatile too. I've made it into a witch accessory, but you could totally just be a spider web for Halloween and put a huge plastic spider on your back.
All you need is:
fleece fabric - about 1 yard for a small child, 1 1/2-2 yards for an adult
tailor's chalk or sidewalk chalk
1 yard of ribbon
sharp fabric scissors
ruler or measuring tape
*First, I want to explain why using sidewalk chalk is so great. Regular chalkboard chalk is sometimes hard to draw with on fabric, especially fleece. Sidewalk chalk that has gotten wet and then dried again, is softer and easier to work with on this project.

Tip 1: To ensure you have enough fabric for your cape, you might want to measure how long you want the cape to be before heading to the fabric store. You do this by placing the measuring tape at the back of your neck and letting it hang down your back. Most fleece comes about 55-60 inches wide. If you want to keep this a no-sew project, keep in mind that it needs to be no longer or wider than the width the fleece comes in.
Tip 2: Measuring tape can act as a great over sized protractor when you are marking out your quarter circle. Be sure that the tip of the tape stays at the corner and that you mark the same length all the way across to get the proper arc.


Tip 4: If you are worried about the chalk outlines, don't fret. The sidewalk chalk rubs out very easily. If you have some stubborn spots, rub them out with a damp rag or sponge.

And that's all there is to it!

The fleece adds a little bit of warmth and there is no worry about fraying.

I didn't plan on making matching costumes for my daughter and me. In fact, it is pretty uncharacteristic of me to do something like that.

But...somehow it just happened. :) I made a cape for her and decided I just had to have one too!

I dressed up for pictures, but I will likely wear jeans, a sweater and this cape and be a spider web for Halloween. I am pretty low key when it comes to my own Halloween attire.

Although, I have to admit, it is pretty fun to flap around the house in this cape and hat and say, "I'll get you my pretties!" while I cackle at my children. Halloween is so awesome like that. It brings out the suppressed thespian in almost everyone.
For more great Halloween inspiration, be sure to check out C.R.A.F.T. and Really Awesome Costumes!
P.S. My daughter's witch dress was made using Look 4 from the Five & Ten Designs Volume One e-book. I'll share more about that and our witch hats soon.
DIY Natural Hand Sanitizer

One of my all-time favorite messages for families is: Go to your kitchen cabinet before your medicine cabinet.
That’s one I work with at the Whole Child Center and a core theme of my book, Treatment Alternatives for Children. (Sidenote: all these remedies work for us big kids, too.) Some of the most amazing safe, cheap and effective treatments can be grown in your garden or found at the market rather than in the pharmacy.
A prime example is my DIY natural hand sanitizer. Modeled on the mythical “Thieves” blend of essential oils, my hand sanitizer recipe includes oils with proven anti-bacterial and anti-viral properties and adds aloe vera gel for smoothness.
What I keep out is just as important: no irritating alcohol or hormone-disrupting toxic chemicals found in many conventional hand sanitizers. When soap and water aren’t available, mix yourself up a batch of this sweet-smelling natural spray and you’re good to go. Clean… and green.
- Start with a 4 ounce spray bottle.
- Fill it about ¾ full with sterile water.
- Add 1 TBSP of aloe vera gel.
- Add 10 drops each of cinnamon, clove, rosemary and eucalyptus essential oils.
- Add 20 drops of either lemon, orange or grapefruit essential oil – whatever aroma fits your mood.
- Place the spray dispenser top on securely and mix thoroughly.
- Spray two or three times on your hands and rub together.
- Repeat as needed.
Note: You can substitute a 1 ounce bottle size for travel. Change the amounts as follows: 1 tsp aloe vera gel, 2 to 3 drops of the four primary oils and 5 to 10 drops of your choice citrus oil.
DIY Pain Relief Lotion Bars

Lotion bars are one of my favorite natural beauty recipes to make. They are a simple way to moisturize and nourish the skin and they can be easily customized for a variety of uses. This variation is one of my favorites, especially for after athletic training or on sore muscles. I don’t use it during pregnancy, but it is great at other times. I also make a diluted version by using half as much Menthol and Essential Oil and omitting the Arnica oil for use on the kids when they get growing pains.
These natural pain relief lotion bars smell excellent and work wonders on sore or tired muscles!
Ingredients:
- 1/3 cup coconut oil
- 1/3 cup shea butter, cocoa butter or mango butter
- 1/3 cup beeswax (can add an extra ounce or two if you want a thicker consistency, which leaves less lotion on the skin when used)
- 1 tablespoon of Menthol Crystals
- 10 drops Peppermint Essential Oil
- 1/2 tsp Arnica Oil (optional)
This recipe can be adjusted to make any quantity that you’d like. I made with 1/3 cup of each main ingredients, but this can adjusted up for down for bigger or smaller batches.
How to Make:
Combine all ingredients in a quart size glass mason jar and carefully place this jar in a small saucepan of water on the stove.
Turn the burner on and bring water to a low simmer. Stir ingredients constantly until they are melted and smooth.
Remove from heat and stir in the menthol crystals and stir until dissolved.
Add essential oils and arnica oil (optional) and stir until mixed.
Carefully pour into molds or whatever you will be allowing the lotion bars to harden in. I used these silicon loaf molds, though any mold would work.
Allow the lotion bars to cool completely before attempting to pop out of molds. These could be made in different shaped molds or made in a square baking pan and then cut into actual bars.
How to Use:
Store in a cool or dry place for up to six months (I’ve even had some last as long as a year).
To apply to skin: hold bar in hand and carefully rub on dry skin. The heat of the skin will transfer some of the lotion bar to the skin. I store my lotion bars on a small plate on my dresser and bathroom counter. Add more or less menthol for a more or less potent bar.
Monday, September 23, 2013
Shampoo Bar Soap Recipe
Too much info on this one to even think about sharing. I'm just going to give you the link and you can take it from there. http://frugallysustainable.com/2011/12/shampoo-bar-soap-recipe/
Cinnamon Bun Pie Crust
http://www.justapinch.com/recipes/dessert/pie/cinnamon-bun-pie-crust.html?p=3 Cinnamon Bun Pie Crust
Ingredients
 1. Roll out pie dough, brush lightly with melted butter and sprinkle cinnamon over the entire surface
 2. Roll the crust into a log and slice thinly.
 3. Press into pie plate
 4. If making a top crust arrange the sliced dough onto wax paper shape into a circle (as much as possible) top with another sheet of wax paper and roll lightly. remove the top paper, pinch together any open areas and lift the wax paper over to the pie plate and flip carefully peeling of paper
Cinnamon Bun Pie CrustIngredients
clear glass pie plate
store bought pie crust, i used both crusts for the bottom of this pie because i ws pressing them in if you want a thinner bottom crust you can use only one crust and roll it as i do for the top
1/4 c melted butter
3 Tbsp cinnamon or to taste
Directions1. Roll out pie dough, brush lightly with melted butter and sprinkle cinnamon over the entire surface2. Roll the crust into a log and slice thinly.3. Press into pie plate4. If making a top crust arrange the sliced dough onto wax paper shape into a circle (as much as possible) top with another sheet of wax paper and roll lightly. remove the top paper, pinch together any open areas and lift the wax paper over to the pie plate and flip carefully peeling of paperPreserving the Harvest: Fresh-Frozen Herbs in Oil, Butter, Broth or Water…
http://www.thegardenerseden.com/?p=13221 Fresh Herbs from the Garden
Fresh Herbs from the Garden
Begin by gathering empty ice cube trays (or egg cups or small freezer molds), zip-lock or other storage bags, and bundles of fresh herbs from the garden. Bring the herbs inside, and as you wash, dry and pick through the leaves, think about how you might like to use them over the coming months. Do you make lots of soup in winter? Set aside a few bundles of your favorite soup herbs. These can be frozen in cubes of room-temperature water, vegetable broth or chicken/beef bouillon. Do you like to fry or roast with herbs? Bundles of your favorite cooking herbs can be preserved by freezing them in vegetable oil (I like to use light olive oil for high-temp pan frying). If you like to use herb butters or herb-infused oils for bread dipping, you can freeze them in butter (softened or melted over very low heat and cooled a bit) or in extra virgin olive oil, to pull out of the freezer later and enjoy at room temperature all winter long.
 Separating Fresh Herb Leaves for Simple Frozen Oil Cubes
Tear or chop the herbs into small pieces or individual leaves, depending upon how you plan to use them at a later date. Next, load ice cube trays, egg cups or other freezer molds with the clipped herbs. You can separate individual herbs into molds or you can mix them in combinations you frequently use together. I make both individual herb cubes and various combinations. I started with olive-oil cubes for pan-frying this time. Once my compartments were filled with herbs, I began filling the cubes with oil, topping each herb mold with one or two tablespoons of light (frying) olive oil. Then I made herb cups with melted butter and extra virgin olive oil. Finally I put away large quantities of herbs preserved in vegetable broth (you can use any kind of broth) and water (for herb tea and soup).
 Simple Cubes of Olive Oil with Fresh Basil and Olive Oil with Fresh Rosemary – Ready to Stick in the Freezer
Once the molds are filled, freeze them overnight. You may wish to make a note of the herb content and oil/water measurement in each tray. Once frozen, it can be tricky to identify the herbs. I do freeze in batches and make notes to avoid confusion later. Once removed from the freezer, pop the cubes from the trays and slip them into labeled plastic bags. I write the name(s) of the herbs, the fluid measurement, and the date on my bags. Then, I store them flat in the freezer (they should remain in separate units, unless they melt – so work quickly!). Now, you can enjoy fresh herbs in your cooking all winter long, at a fraction of the market cost!
 After Freezing for 24 Hours – Remove the Cubes from the Trays and Separate into Labeled Ziplock Bags. Store Flat in the Freezer.
There are many ways to preserve and store your garden produce. This particular method of freezing herbs has been around for a long time —my mother and grandmother used to preserve them in this way— and it works very well.
Subscribe to:
Posts (Atom)