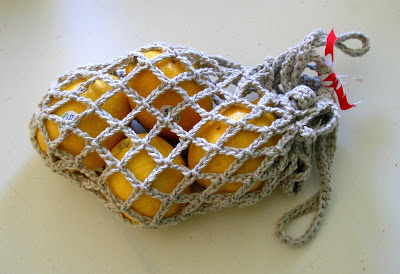
Taking inspiration from this crocheted version:
I made my reusable produce bag out of an old knit T-shirt.
And then I went crazy! and made more bags out of old T-shirts and T-shirt sleeves in various shapes, colors, and sizes.
It is really easy and requires very little sewing. Hence why I made so many! :)
So let's get started shall we?
1.)You just take an old T-shirt and turn it inside out. Draw and then cut out a bag shape you like.
I made some small, some large.
Some using the existing T-shirt hem and some not.
2.)Sew with a straight stitch or a narrow zig zag all the way around. You can leave it like this.
Or you can finish the edge with:
A French seam.
A zig-zag stitch or serged edge - my favorite way. {left - orange}
Make the seam allowance much smaller - like 1/8 of an inch. You don't have to worry about fraying so this works fine. {right - pink}
Or fold the seam allowance over to one side and stitch all the way around. It makes it tricky to sew around corners and mine puckered a litte, but once you get to the next step you won't be ablt to notice.
3. )You can do this next part 2 ways:
Option 1: Draw lines to help guide you when you cut slits.
and snip, snip, snip...with the tips of your scissors.
You want to stagger the cuts like so...
**Here I made the cuts wide and I cut across the side seams so there would be holes all the way around. More like the crocheted version.
Just make sure you don't cut the sides too much, thus making the holes too large. Remember that cutting on the side doubles the length of your cut. I made that mistake and had make a couple of sewing adjustments. :)
Option 2: Using your rotary cutter...

Just eye-ball the staggered cuts and slice them quickly across. Make sure to use the ruler and gridded mat to help keep things pretty even and neat.
This method is hands down WAY faster and makes for less wear and tear on the tips of your scissors and your wrists.
***And you will notice that for this bag I did not cut over the seams. Either way works. If you decide to cut over the seams though, I recommend that you sew it initially with a narrow zig zag stitch so the stitches won't unravel as easily when you cut across them.
Oh and remember...to stop cutting slits about 4 inches or more from the top. You want room for the handle.
4.) Cut a slit for the handle and shape the sides if you like. I did on some and on others I didn't.
5.) Then streeeeeeeeeeeetch the bag.
That's it! So easy right?
If you wash and dry it, the slits curl up a bit and it looks even better:
Some knits don't curl well, but I think it still looks pretty cool.
You can use them for produce, as the name implies,
or as my husband suggested {he is a genuis} you can use them at the beach for your sandals!
So smart!
You can pack them in with your reusable grocery bags so you remember to use them at the store. I don't think they can entirely replace the plastic bags. Sometimes you need those to keep the food fresh or for very small produce.
I will likely bring them with me to the farmer's market or to pick and store my harvest from my own garden.
I made this one big enough to be a tote. I bet I can even put the smaller ones inside this bigger one to keep everything organized.
They are completely washable and can withstand hot washing temperatures, which I love.
And you can make a whole rainbow of them to help color your summer!


No comments:
Post a Comment