Featured Post

Best Homemade Dog Shampoo: All Natural Oatmeal Dog Shampoo

I found this DIY dog shampoo at this link.  Within the post is a link to her homemade flea shampoo.  https://www.freebiefindingmom.com/b...

Saturday, August 31, 2013

Homemade Coffee Creamer


COFFEE DRINKERS....THANK ME LATER....

Homemade Coffee Creamer – Over 2 Dozen Flavor Varieties!
SHARE this to your TIMELINE so you won't lose it.

For whatever flavor of creamer you want, you start off with the same basic ‘base’ recipe.

14oz sweetened condensed milk
1 3/4 cup milk or cream (whole, lowfat, skim, almond, soy, heavy cream, half & half etc – whatever your preference, however the more fat, the more creaminess)

Mix the ingredients together well. Add them to a mason jar and shake it like crazy or you could also opt to use an old (washed) creamer container.

French Vanilla Creamer
2 teaspoons vanilla extract OR vanilla coffee syrup

Vanilla Bean Coffee Creamer
2 teaspoons vanilla bean paste

Chocolate
2-3 tablespoons chocolate syrup
(1 tsp vanilla extract, optional)

Chocolate Almond
1 tablespoon cocoa powder
1 teaspoon almond extract

Strudel
1 tablespoon cinnamon
1 teaspoon vanilla extract
1 teaspoon almond extract

Vanilla Caramel
2 tablespoons caramel ice cream topping
2 teaspoons vanilla extract

Chocolate Raspberry
2 teaspoons cocoa powder
2 tablespoons raspberry syrup

Irish Cream
2 tablespoons chocolate syrup
1 teaspoon instant coffee
1-2 teaspoons vanilla extract
1 teaspoon almond extract

Coconut
2 teaspoons coconut extract

Samoa (like the Girl Scout Cookies)
2 teaspoons coconut extract (or sub coconut milk or cream of coconut, heated & strained, for the milk/cream)
2 tablespoons chocolate syrup
2 tablespoons caramel ice cream topping

Peppermint Patty
2 tablespoons chocolate syrup
1 teaspoon peppermint extract

Cinnamon Vanilla
2 teaspoons cinnamon
2 teaspoons vanilla extract

Pumpkin Spice
3 tablespoons pureed pumpkin
1 teaspoon pumpkin pie spice
4 tablespoons maple syrup
1 teaspoon vanilla extract

Honey Vanilla
1/4 cup honey
2 teaspoons vanilla extract

Almond Joy
1-2 teaspoons coconut extract (or sub coconut milk or cream of coconut if you heat it first, strained, in place of the milk & extract)
1 teaspoon almond extract
2 tablespoons chocolate syrup

Sweet Cream
Use 1 3/4 cups of heavy cream instead of the milk in the base recipe
2 teaspoons vanilla extract OR the inside of a vanilla bean, scraped
1 teaspoon almond extract

Chocolate Orange
2 tablespoons chocolate syrup
1-2 teaspoons orange extract

Hazelnut
2 teaspoons hazelnut extract

Chocolate Hazelnut
2 tablespoons chocolate syrup
2 teaspoons hazelnut extract

Cinnamon Cake
2 teaspoons cinnamon
2 teaspoons vanilla extract

Salted Caramel
2-3 tablespoons caramel ice cream topping
1/2 teaspoon salt

Eggnog
replace milk in base recipe with equal amount of heavy cream
1 teaspoons vanilla extract
2 teaspoons rum extract
1 teaspoon ground nutmeg

Toasted Almond
2 teaspoons almond extract

Directions & Tips:
In all these recipes, anything that has a dry or thick ingredient (like cinnamon, honey, etc..) should be heated up with a small amount of your milk/cream from the base recipe so it can dissolve properly. You don’t want grainy creamer! Then, add the rest of the milk/cream along with the sweetened condensed milk.

If you want really creamy creamer, use heavy cream instead of milk in your base recipe.

You'll want to stick a piece of tape on they mason jar lid with the expiration date from the milk used. Use this as a guideline as to when the creamer should be used by.

Please feel free to play around with amounts of extracts and other ingredients used if you like stronger or less intense flavors!! And, let your imagination turn, and make up your own combinations. Use this as inspiration to create your very own perfect homemade flavored creamer!

Friday, August 30, 2013

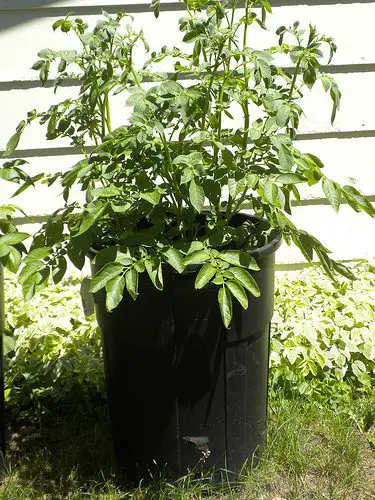
How To Grow LOTS Of Potatoes In A Trash Can

http://allaboutfoodstorage.com/wp-content/uploads/2009/03/trash_can_potatoes.pdf

5902031557_9e425971d4

Want a fun, low on space way to grow potatoes? Grow them in a garbage can!
With either a new a garbage can (or a used one that is super-clean), drill several 1/2 drainage
holes in the bottom and on the sides close to the bottom.
In the bottom of your garbage can, place a layer of
shredded newspaper or old junk mail. This helps to keep
the soil that you add on top of this moist and also helps to
keep the soil from finding its way out of the drain holes to
make a mess. You then fill the can with about 6 inches of
good potting soil, and if you like, some fertilizer. I
personally would use the "square foot gardening" mix of
1/3 peat moss, 1/3 compost and 1/3 asbestos-free
vermiculite.
Take a few seed potatoes and cut them up, leaving several
eyes on each piece. Alternatively, you can use regular store
potatoes, but they may not grow as well. Plant the potato
pieces in the six inches of soil, leaving several inches between
each seed. You cover these seed potatoes with soil (about an
inch), and water them.
The potato plants will sprout. When the vines grow 4" high, you add compost, more soil, or
straw to the garbage can, covering all but 1" of the vine. You keep doing this until the garbage
can is completely full. It is very important that you do not let the soil get
dried out; at the same time, don’t let your potatoes sit in soggy water.
You then have the seed potatoes at the bottom and several plants that
have grown up to the height of the garbage can. If needed, you can
stake up the vines that grow out of the top of the can. The vines will
flower, and then potatoes will grow all
up the length of the vine.
You can gently dig right in whenever
you want a potato. When you dig in to
get one while the vine is alive, this is a
"new potato", sometimes called a “baby potato”. They are
extremely tasty when fresh from the plant. The "new potato"
will not store long, so eat them soon after picking them. When
your flowers start to fade, your stalks will start to turn yellow.
Your big potatoes are growing now.
You can get up to 40 lbs or more from one season’s growth

'via Blog this'

Wednesday, August 28, 2013

Government Surplus Auctions at Government Liquidation

Government Surplus Auctions at Government Liquidation:

'via Blog this'

pineapple, cream cheese, pecan, snowball cookies


NO BAKE - Cream Cheese, Coconut, Snowball's Recipe

1 package (8 ounces) cream cheese, softened.
1 can (8 ounces) crushed pineapple, well drained.
1 cup chopped pecans
3 cups flaked coconut.

In a small bowl, beat cream cheese and pineapple until combined then fold in the pecans. Cover and refrigerate for 1 hour.

Take out of refrigerator and roll into 1-inch balls; then roll the balls in the coconut. Refrigerate for 4 hours or overnight.

Yield: about 2 dozen.

7 Up Biscuits Recipe | Just A Pinch Recipes

7 Up Biscuits Recipe | Just A Pinch Recipes:

Ingredients

2 cBisquick mix
1/2 csour cream
1/2 c7 Up
1/4 cmelt

Directions

1
 Preheat oven to 450 degrees.
2
 Cut sour cream into your Bisquick mix, then add 7up - it will make a soft dough. Now sprinkle your counter with a little Bisquick mix then add dough and pat it out.
3
 Melt butter and pour it into a 9" square baking pan. Cut your biscuits up and arrange them in pan on top of melted butter. Bake 12-15 minutes or until golden brown.

15 Secrets to Dutch Oven Cooking

15 Secrets to Dutch Oven Cooking - SHTF Preparedness - SHTF Preparedness:

15 Secrets to Dutch Oven Cooking  |  Design Mom
Images and text by Lindsey Johnson for Design Mom.
Are you ready for another installment of our Outdoor Cooking series (here’s part one)? I am too!
Cooking in a Dutch oven is one of life’s pleasures, I think. It’s hard to duplicate the feeling of cooking outdoors in a big, cast-iron pot over hot coals. It’s hard to duplicate that flavor too — a cross between cooking over a fire and using a slow cooker. I love it (if that wasn’t already obvious). :)
Dutch ovens have been around for years and years and years. Now that most of us do our daily cooking indoors on and in modern stoves and ovens, it seems like Dutch oven cooking is more for hobbyists and campers. If you haven’t enjoyed Dutch oven cooking as the cook or the eater, you’ve been missing out! It’s a lot of fun.
15 Secrets to Dutch Oven Cooking  |  Design Mom15 Secrets to Dutch Oven Cooking  |  Design Mom
Cooking with a Dutch oven might seem a little intimidating or complicated. I totally get that! But what you put into the Dutch oven is pretty simple and uncomplicated; the cooking part is where it can get a little tricky. There’s a bit of a learning curve to get the timing and temperature just right, but once those two things are covered, you’ll be set.
15 Secrets to Dutch Oven Cooking  |  Design Mom15 Secrets to Dutch Oven Cooking  |  Design Mom15 Secrets to Dutch Oven Cooking  |  Design Mom15 Secrets to Dutch Oven Cooking  |  Design Mom
You can cook or bake practically anything in a Dutch oven — they are incredibly versatile. Over the years we’ve modified old family favorites for use in a Dutch oven as well as finding new ones.
So, it’s time to pull out your favorite recipes and a pen and paper to take some notes!
15 Secrets to Dutch Oven Cooking  |  Design Mom
You will want to purchase or borrow a few things to get ready for your Dutch oven cooking adventures. You don’t need a ton of equipment, but there are a few essentials that you don’t want to be without. I’m listing them here and will cover each in a bit more detail as we go along.
-One or two Dutch ovens (or more if you’ve got a crowd!)
-Charcoal chimney starter
-Charcoal briquettes
-Something to put the lid on (a muffin tin works well)
-lid lifter
-high heat resistant gloves
-straw broom
-lighter fluid (optional, not pictured)
15 Secrets to Dutch Oven Cooking  |  Design Mom
DUTCH OVENS AND PREPARATION
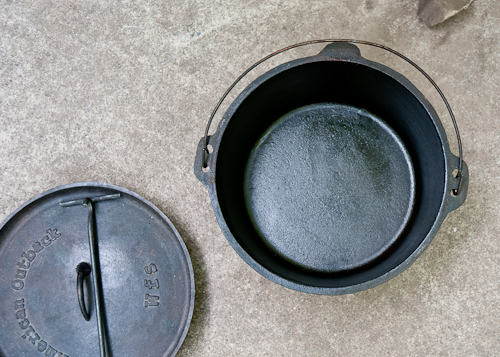
As with anything, cooking with Dutch ovens does require a some planning and preparation. Secret #1: You should buy a Dutch oven a little before you plan on using it to make sure you have time to properly season it. A well-seasoned Dutch oven makes for happier cooking and cleaning up. Seasoning means that it’s been rubbed with oil or vegetable shortening and baked in an oven for a few hours to develop a nice, black coating on the surface of the entire Dutch oven. It will become further seasoned as you use it, eventually becoming nonstick.
15 Secrets to Dutch Oven Cooking  |  Design Mom
Treat Dutch ovens as you do cast iron skillets and pans. If you’ve used those, it’s the same process for seasoning and care. There are aluminum Dutch ovens available, but the most common ones sold and used are cast iron. That’s what we’ll be talking about in this post.
Dutch ovens come with heavy lids that provide a good seal during cooking. Because the Dutch ovens are made of heavy cast iron, they retain heat very well. In fact, they can stay warm for hours and hours after cooking. Dutch ovens are best used for recipes requiring a long, slow cooking time, like stews, roasts, chili, etc. But they can also be used for things that cook in 30 minutes or less, like quick breads, rolls, cakes and cobblers. Dutch ovens lend great flavor to food from the oven itself and the charcoal briquettes. (You can’t get that from your indoor oven or a slow cooker!) Though I’m not covering the techniques in this post, dutch ovens are great for cooking bread and deep frying, as well.
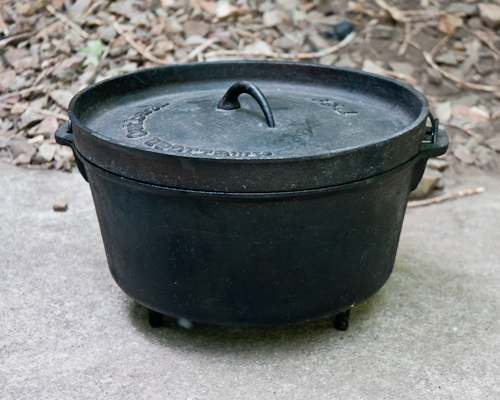
Generally the cooking temperature will be about 350-400 degrees F. The cooking heat is generated from using coals placed underneath the pan and on top of the lid. You’ll see Dutch ovens with flat bottoms or with three little legs. The flat ones are better for indoor cooking. The ones with legs are the kind for outdoor use. I’m sure they were designed that way for other reasons too, but the little legs are nice because the Dutch oven keeps upright much better over the coals.
Let’s talk about the charcoal for a minute because it is such an important part of Dutch oven cooking!
15 Secrets to Dutch Oven Cooking  |  Design Mom
CHARCOAL
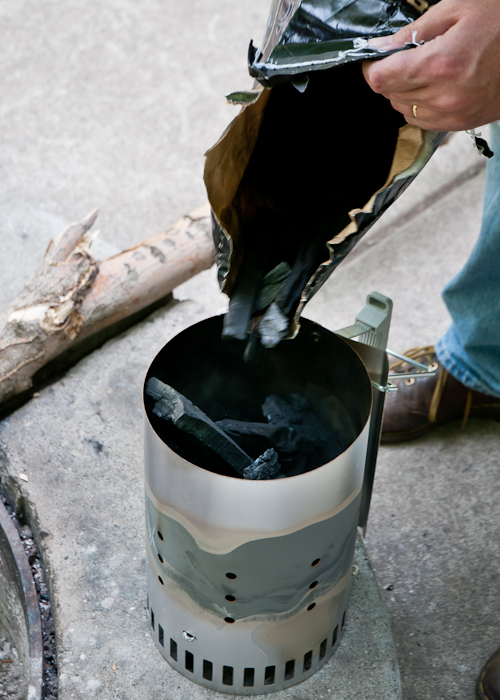
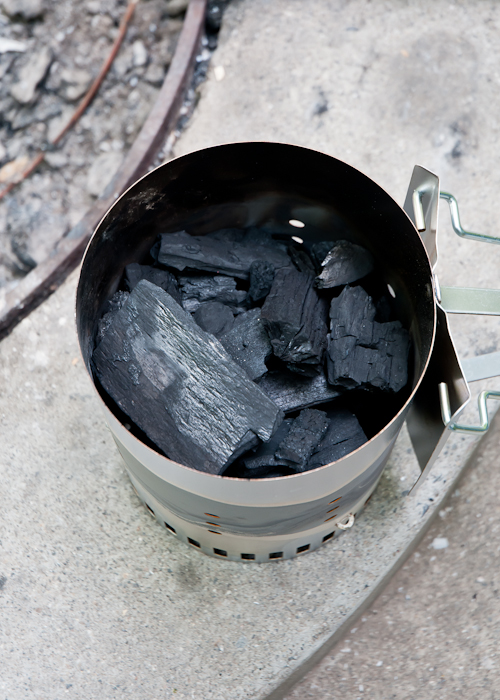
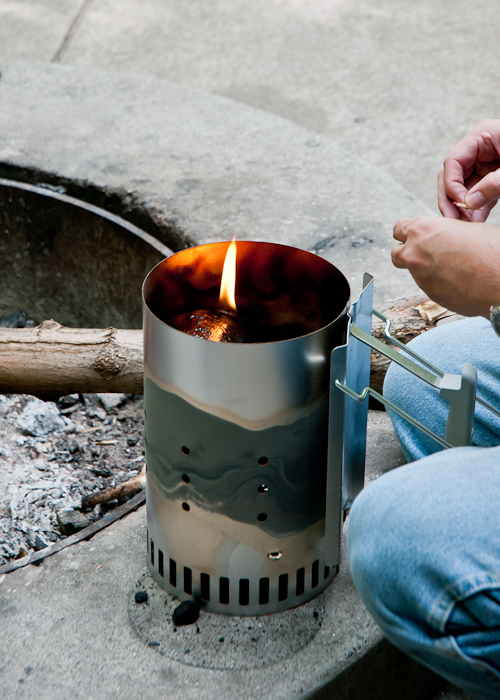
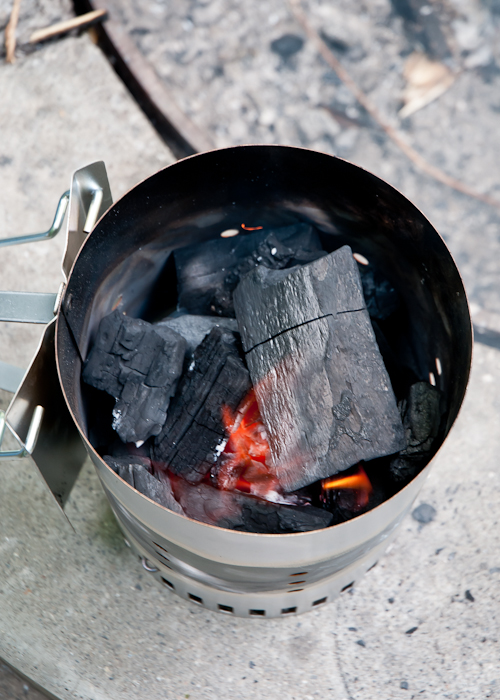
For getting the coals hot, we prefer using a charcoal chimney starter.
The advantage of a charcoal starter is that you can get the coals started quickly and (usually) evenly. The tall chimney shape keeps the coals protected from wind and keeps them together as they heat up. I honestly would recommend investing in one if you do a lot of cooking with charcoal. Secret #2: The charcoal needs to be started about 20-30 minutes before you plan on starting to cook. If you use a charcoal starter, it might only take 15 minutes. I use that time to mix my ingredients together. By the time I’ve put everything into the Dutch oven, the coals are hot and ready to be used.
15 Secrets to Dutch Oven Cooking  |  Design Mom15 Secrets to Dutch Oven Cooking  |  Design Mom
Directions for lighting charcoal:
Put charcoal in charcoal burner, drizzle with a little lighter fluid (optional, but helps to get it going quickly), the carefully add a lighted match.
15 Secrets to Dutch Oven Cooking  |  Design Mom
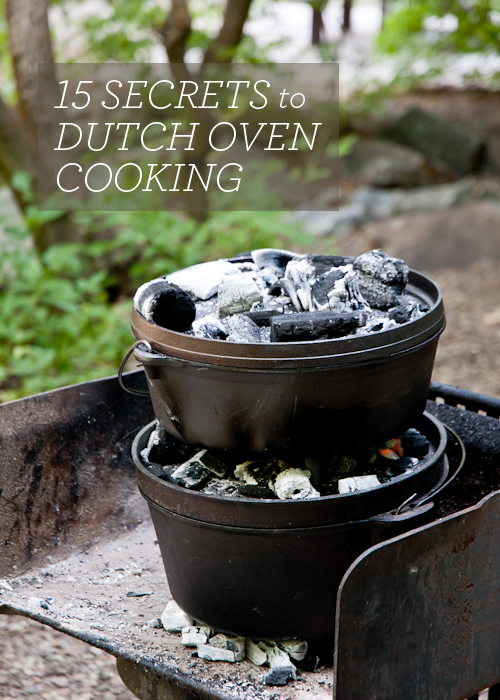
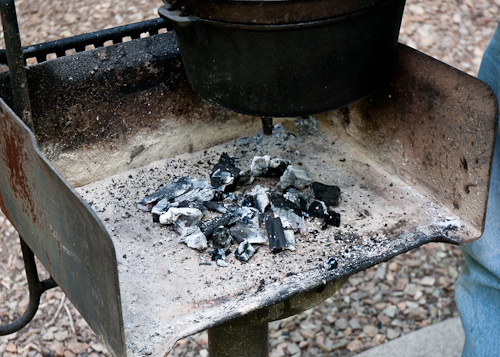
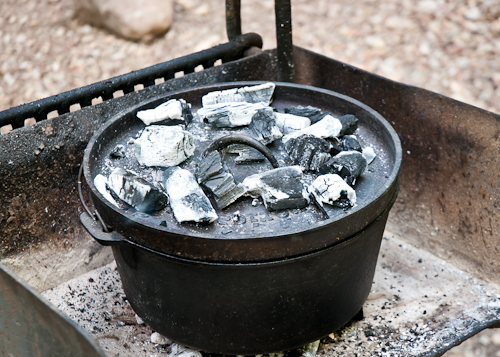
The general rule of thumb is two charcoal briquettes per inch in diameter, and typically more coals are placed on top than on bottom.  For example, a 12-inch Dutch oven would have 14 coals on top and 8 underneath for a temperature of about 300 degrees F. Secret #3: To raise the cooking temperature 25 degrees F, add an extra (preheated) briquette on both top and bottom.
Secret #4: The arrangement of the coals also matters. They need to be arranged evenly both top and bottom. Usually this is a circle around the perimeter with a few in the center. I’ve arranged them a little differently here because I was using the hard wood briquettes and they weren’t uniform in size.
15 Secrets to Dutch Oven Cooking  |  Design Mom15 Secrets to Dutch Oven Cooking  |  Design Mom
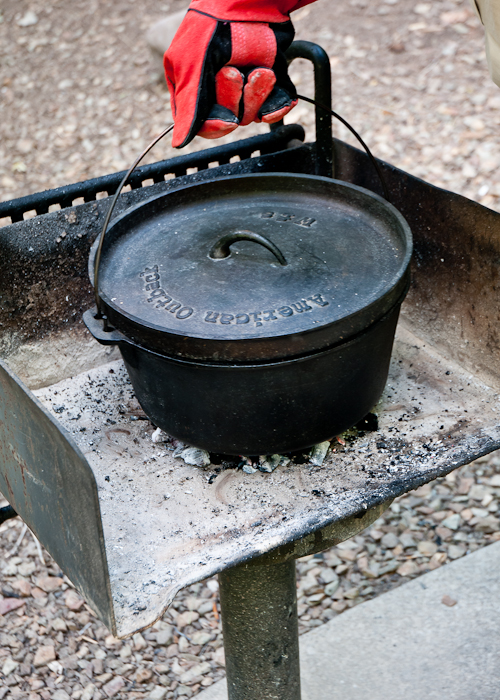
Ovens can go almost anywhere to cook just about anything you want. This could be your backyard, a park, campsite, etc. Just make sure the surface is heat proof. Concrete works great as does dirt. You can use Dutch ovens in a fire pit or on a grill like the one in the picture. I chose to do it this way for this post because I liked that it was high off the ground — while my kids were running around and playing. It also made it easier for me to check on it. But we also like placing it in on the ground in a fire pit because we can cook other things over the coals at the same time. Either way works great!
Dutch ovens come in various sizes. The most common sizes are 10″, 12″ and 14″. They also vary in depth. The bigger (and deeper) the Dutch oven, the more people you can feed, and the heavier they are. Keep that in mind too. We usually use 12″ ovens to cover our basic cooking needs.
15 Secrets to Dutch Oven Cooking  |  Design Mom
COOKING
Let’s talk a bit about the Do’s of Dutch oven cooking.
Secret #5: Do season it well and then rub the inside with a little oil every time you use it.
15 Secrets to Dutch Oven Cooking  |  Design Mom
Even though the Dutch oven has been seasoned, it’s a good idea to rub the inside with a little oil before using it. I just pour a little in the bottom and use a paper towel to wipe the entire inside. The outside doesn’t need to be rubbed with oil again before cooking. Also, Dutch ovens don’t require preheating, so unless a specific recipe lists preheating as part of the instructions, you won’t have to worry about doing that.
15 Secrets to Dutch Oven Cooking  |  Design Mom
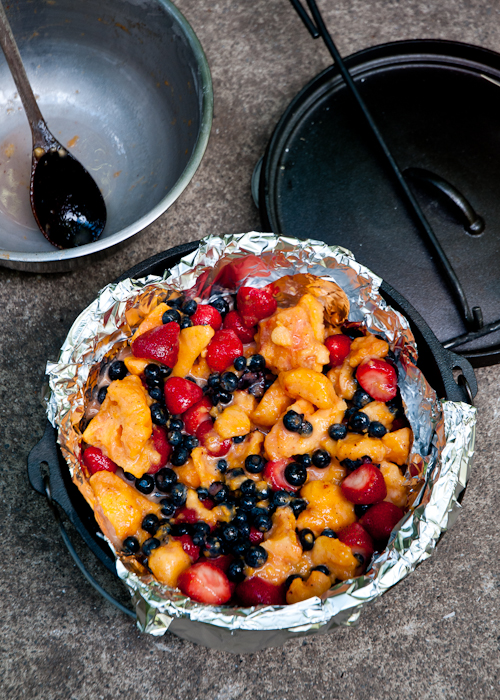
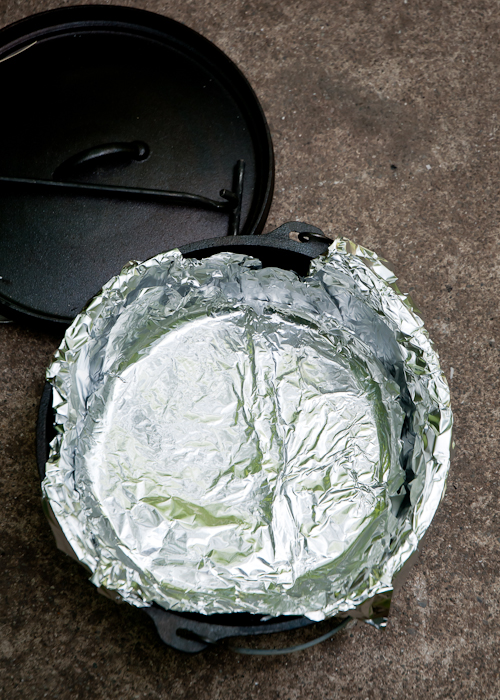
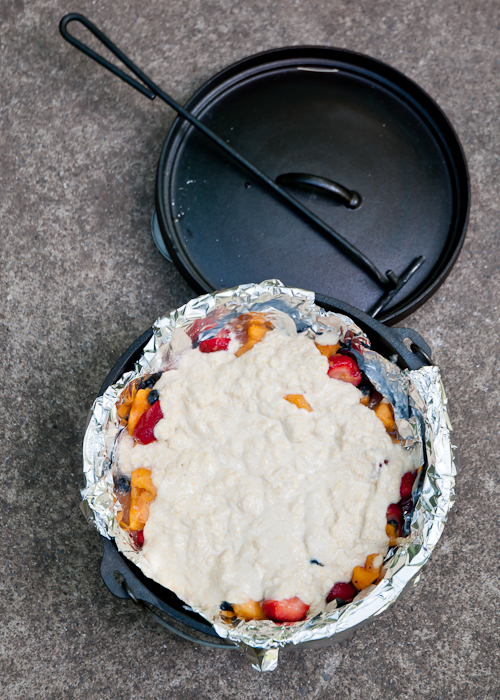
Secret #6: Do line the inside with foil if you need to. Need to = if you’re cooking something especially sticky like fruit cobbler. Or, if you’re using acidic ingredients like tomatoes, lemon juice, wine, or vinegar, because they can remove some of the seasoned interior. To be honest, I usually don’t use foil with the acidic ingredients, but I am careful not to let the food sit in the dutch oven for too long after it’s done cooking.  Note: It will take a little longer to cook if you line it with foil.
15 Secrets to Dutch Oven Cooking  |  Design Mom
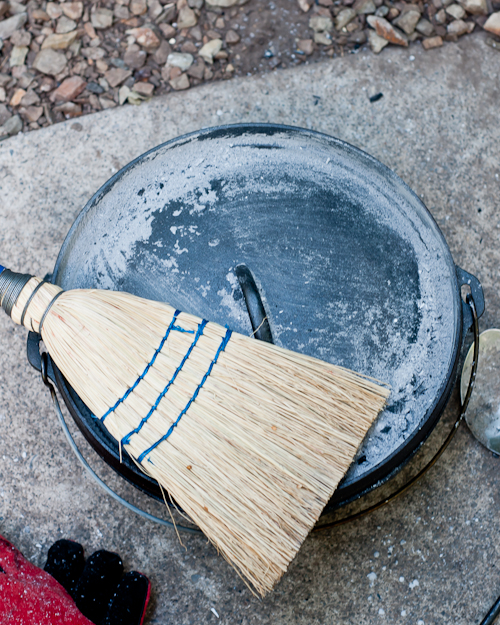
Some other quick Do not’s for Dutch oven cooking include Secret #7: Don’t ever pour cold water into a hot oven to cool it off, it will ruin it. Secret #8: Don’t drop it! They look indestructible, but they can break, or break your toe. : )Secret #9: Make sure the lid is on properly and fits tightly so heat doesn’t escape. And don’t set the lid directly on the ground — use a pan, brick, or rock (I like using an upside down muffin tin) — it keeps dirt or other things from being transferred from the ground to your food. Secret #10: Don’t use plastic or silicone cooking utensils. Wood or metal only. Secret #11: When you’re finished cooking, do use the broom to clear the lids of ash so that it doesn’t get into the food.
15 Secrets to Dutch Oven Cooking  |  Design Mom
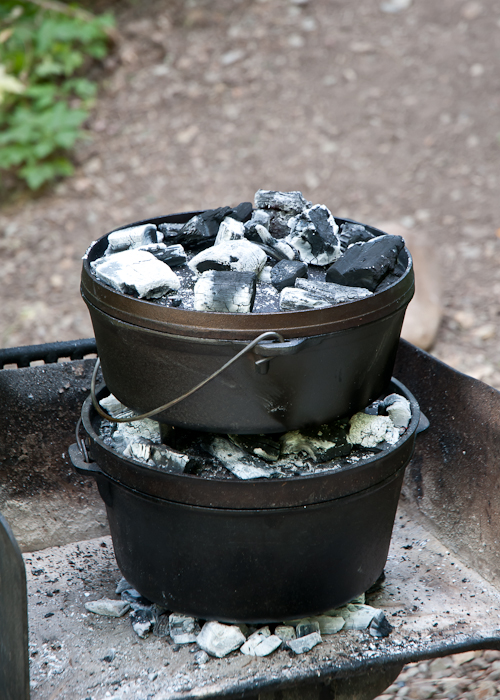
Secret #12: If you have more than one Dutch oven, you can stack them. The coals on top of the bottom oven become the bottom coals for the top oven. Know that this will require more time and you might have to add fresh coals to keep it cooking hot enough for both ovens.
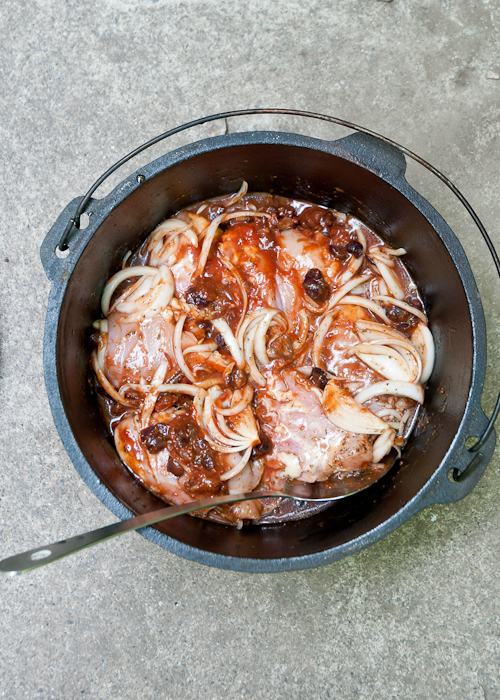
Secret #13: Timing depends on recipes, ingredients, and the size of the dutch oven. For example, with my Chicken Provencal stew (pictured in this post), I wanted to add some zucchini. Like with slow cookers, zucchini would disintegrate during a long cooking period. Add things that cook quickly near the end of cooking time. I added the zucchini about 30 minutes before the stew was ready. Start the ovens that takes the longest to cook first — desserts and ovens with just vegetables don’t take as long to cook. Also, you’ll need to add more time for deeper ovens.
Secret #14: As far as clean up goes, if the Dutch oven is well-seasoned, it will be a snap! It should just wipe out. (Toss any aluminum foil you might have used.) If the food was too messy to simply wipe out with a paper towel, use a little water or oil mixed with some salt. It will help scour the inside without damaging the seasoning. Let it dry thoroughly, then rub inside and out with oil.
Before we get to recipes, here’s one last rule of thumb I’ve found helpful, Secret #15:
If you can hear it, it’s hot enough.
If you can smell it, it’s probably getting close to being done.
15 Secrets to Dutch Oven Cooking  |  Design Mom15 Secrets to Dutch Oven Cooking  |  Design Mom
RECIPES
I chose one of my favorite recipes to turn into a Dutch oven recipe — this Chicken Provencal is amazing! We usually do it in the oven or slow cooker. Happily it’s even more delicious in the Dutch oven! Stews do really well in Dutch ovens. We also made a Summer Fruit Cobbler.
Dutch Oven Chicken Provencal Stew
adapted from Big Girls, Small Kitchen
For one 12-inch Dutch oven, to feed 6-8
Ingredients:
3 lbs. bone-in chicken thighs, skin removed (can use boneless)
1 large onion, thinly sliced
1/4 cup red or white wine vinegar
1/4 cup chicken stock or white wine
1 small can tomato paste
3 Tablespoons brown sugar
3 Tablespoons olive oil
3 Tablespoons minced fresh garlic
1/4-1/2 cup chopped, pitted kalamata olives
5 large pitted dates, chopped
2 Tablespoons fresh oregano (or 1-2 teaspoons dried)
Salt and pepper, to taste
2 zucchini cut into 1/2″ rounds
6 whole roma tomatoes
Fresh parsley, for garnish
Instructions:
Combine all ingredients except zucchini and roma tomatoes in a gallon sized resealable plastic bag or large bowl covered with plastic wrap. Chill until ready to cook. (Can be done one day in advance.)
Rub the inside of the Dutch oven with oil. Place the entire contents of the bag or bowl into the oven. Arrange the chicken with a spoon or spatula so it is in an even layer. Place the Roma tomatoes evenly around. Place the lid on top.
15 Secrets to Dutch Oven Cooking  |  Design Mom
Place 8 coals under the oven and 14 coals on top. Cook for about two hours or until the sauce has thickened quite a bit and the chicken is falling away from the bone. Add the zucchini during the last 30 minutes of cooking time. Garnish with fresh parsley and serve with crusty bread, potatoes, rice or couscous.
15 Secrets to Dutch Oven Cooking  |  Design Mom15 Secrets to Dutch Oven Cooking  |  Design Mom15 Secrets to Dutch Oven Cooking  |  Design Mom
Dutch Oven Summer Fruit Cobbler
For shallow 12-inch Dutch oven, if using a deeper one, double the fruit and filling ingredients but keep the topping the same
Ingredients:
2-2 1/2 lbs. fresh or frozen peaches
4 cups fresh or frozen berries (I used strawberries and blueberries)
1 cup sugar (use a little less if your fruit is really sweet)
1/4 cup cornstarch
pinch salt
Topping:
1 1/2 cups all-purpose flour
1/2 cup stone ground corn meal (coarse or fine)
1/4 cup dry milk powder (omit if you use fresh milk instead of water)
2-4 Tablespoons sugar
1 Tablespoon baking powder
1/2 teaspoon salt
1 stick (8 Tablespoons) cold butter, cut into 8 pieces
1 1/2 cups cold water or milk (omit dry milk powder if using fresh milk)
Instructions:
For filling-
Mix cornstarch, sugar and salt together. Set aside until ready to assemble cobbler.
For topping-
Whisk all of the dry ingredients together. Add the cold butter and cut into the dry ingredients using a pastry cutter or your hands. The mixture will look like cornmeal with larger, pea-sized pieces of butter remaining. If making in advance, transfer to a large resealable plastic bag or cover bowl with plastic wrap. Chill until ready to make the batter.
To assemble:
For filling-
In a large bowl mix all of the fruit with the cornstarch and sugar. Let stand for a few minutes to allow sugar to dissolve. Transfer to the Dutch oven. (Can line with foil because it will be sticky!)
For topping-
Add the cold water or milk to the bag or bowl and mix just until combined. Pour over the fruit. Put lid on top and use 8 coals on bottom and 14 coals on top. Cook for about 30 minutes or until the juices are bubbling and the top is golden brown.
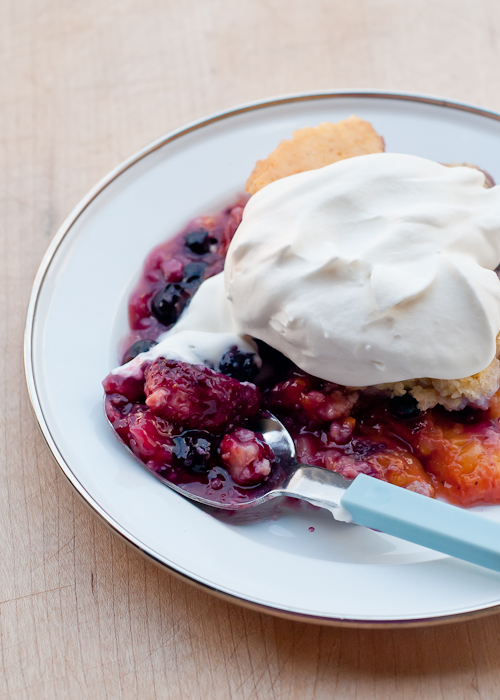
Serve warm with whipped cream or ice cream. Makes about 8-10 servings.
15 Secrets to Dutch Oven Cooking  |  Design Mom
Now, I’m dying to know. Have you ever cooked with a dutch oven? Or eaten a dutch oven meal? What’s your take? Worth the extra effort? And if you’re a dutch oven expert, please add your secrets.
Here’s to outdoor cooking!

Tuesday, August 27, 2013

100+ uses for Vinegar

Primal Rights • View topic - 100+ uses for Vinegar:

GARDEN:

Grow beautiful azaleas: Occasionally water plants
with a mixture of two tablespoons vinegar to
one quart water. Azaleas love acidic soil.

Kill grass on walks and driveways.
Pour full strength on unwanted grass.

Kill weeds. Spray full strength on growth until
plants have starved.

Increase soil acidity. In hard water areas, add
a cup of vinegar to a gallon of tap water for
watering acid loving plants like rhododendrons,
gardenias, or azaleas. The vinegar will release
iron in the soil for the plants to use.

Freshen cut flowers. Add 2 tablespoons vinegar
and 1 teaspoon sugar for each quart of water.

Prolong the life of flowers in a vase. Add two
tablespoons of vinegar plus three
tablespoons of sugar per quart of warm water.
Stems should be in three to four inches of water.

Neutralize garden lime. Rinse your hands liberally
with vinegar after working with garden lime to
avoid rough and flaking skin.
Clean pots before repotting, rinse with vinegar to
remove excess lime.


BUGS AND ANIMALS:

Fish bowl cleaner Eliminate that ugly deposit in
the gold fish tank by rubbing it with a cloth
dipped in vinegar and rinsing well.

Eliminate animal urine stains from carpet. Blot
up urine with a soft cloth, flush several times
with lukewarm water, and then apply a mixture of equal
parts vinegar and cool water. Blot up, rinse,
and let dry.

Deter ants. Spray vinegar around door and window
frames, under appliances, and along other known
ant trails.

Remove skunk odor from a dog.
Rub fur with full strength vinegar; rinse.

Keep cats away. Sprinkle vinegar on an area to
discourage cats from walking, sleeping, or
scratching on it.

Keep dogs from scratching ears. Clean the inside
of the ears with a soft cloth dipped in diluted
vinegar.

Keep away fleas and mange. Add a little vinegar to
your pet's drinking water.

Keep chickens from pecking each other. Add cider
vinegar to their drinking water.

Clean milking equipment. Rinse with vinegar to
leave system clean, odorless, and bacteria free
without harmful chemical residue.


CARS & TOOLS:

Polish car chrome. Apply full strength.

Clean rust from tools, bolts, and spigots. Soak
the rusted tool, bolt, or spigot in undiluted
vinegar overnight.

Keep car windows frost free. Coat the windows
the night before with a solution of three parts
vinegar to one part water.


HEALTH & BEAUTY:

Dampen your appetite. Sprinkle a little vinegar on
prepared food to take the edge off your appetite.

Soothe a bee or jellyfish sting. Dot or douche the
irritated area with vinegar and relieve itching.

Relieve itching by using a cotton ball to dab
mosquito and other bug bites with Vinegar straight
from the bottle.

Relieve sunburn by lightly rubbing it with
vinegar. You may have to reapply.

Take 1 cup of vinegar and warm water into a
large glass and use to rinse your hair after
you shampoo. Vinegar adds highlights to brunette
hair, restores the acid mantel, and removes 
soap film and sebum oil.

You take 1 tablespoon full and swallow when you
have the hiccups. It stops them instantly.

Relieve dry and itchy skin. Add 2 tablespoons to
bath water.

Fight dandruff, by rinsing with vinegar and
2 cups of warm water, after shampooing.

Soothe a sore throat. Put a teaspoon of vinegar
in a glass of water. Gargle, and then swallow.

Cure for colds. Mix one-quarter cup Apple Cider
Vinegar with one-quarter cup honey.
Take one tablespoon six to eight times daily.

Treat sinus infections and chest colds.
Add 1/4 cup or more vinegar to the vaporizer.

Feel good recipe. A teaspoon of apple cider vinegar in a glass
of water, with a bit of honey added for flavor,
will take the edge off your appetite and give
you an overall healthy feeling.

Remove fruit stains from hands. Rub with vinegar.

Remove warts by applying a lotion of half cider
vinegar and half glycerin.
Apply daily to warts until they dissolve.

Relieve arthritis. Before each meal, drink a
glass of water containing two teaspoons
Apple Cider Vinegar.
Give it at least three weeks to start working.

Remove corns by making a poultice of one crumbled
piece of bread soaked in one-quarter cup Vinegar.
Let poultice sit for one-half hour, then apply to
the corn and tape in place overnight. If corn does
not peel off by morning, reapply the poultice for
several consecutive nights.

Cure an upset stomach by drinking two teaspoons
Apple Cider Vinegar in one cup water.

Prevent yeast infections. Douche with one
tablespoon vinegar to one quart warm water,
to adjust the pH balance in the vagina.

Clean dentures by soaking them overnight in
vinegar, then brush away tartar with a toothbrush.

Relieve cough by mixing one-half cup Apple Cider
Vinegar, one-half cup water, one teaspoon cayenne
pepper, and four teaspoons honey.
Take one tablespoon when cough acts up.
Take another tablespoon at bedtime.


LAUNDRY & OTHER CLOTHES CARE:

Use in laundry to cut soap.

Get rid of lint in clothes. Add 1/2 cup of vinegar
to the rinse cycle.

Prevent lint from clinging to clothes: Add one cup
vinegar to each wash load.

Keep bright colors from running. Immerse clothes in
full strength vinegar for 10 minutes before washing.

Freshen up the washing machine. Clean the hoses
and unclog soap scum.
Once a month pour one cup of vinegar into the
washing machine and run the machine through a
normal cycle, without clothes.

Brighten fabric colors. Add 1/2 cup vinegar
to the rinse cycle.

Take grease off suede. Dip a toothbrush in vinegar
and gently brush over grease spot.

Remove tough stains. Gently rub on fruit, jam,
mustard, coffee, tea. Then wash as usual.

Get smoke smell out of clothes by adding a cup of
vinegar to a bath tub of hot water.
Hang clothes above the steam.

Remove perspiration stains from clothes by 
applying one part vinegar to four parts water,
then rinse.

Deodorant and antiperspirants stains may be
removed from clothing by lightly rubbing with
distilled vinegar and laundering as usual.

Cotton and wool blankets become soft, fluffy and
free of soap odor if 2 cups of distilled vinegar
are added to the rinse cycle of the wash.

Clothes will rinse better if a cup of vinegar is
added to the last rinse water. The acid in vinegar
is too mild to harm fabrics but strong enough to
dissolve the alkalis in soaps and detergents.

When dyeing fabric, add a cup full of distilled
vinegar to the last rinse to set the color.

Nylon hose will look better and last longer if
1 tablespoon of vinegar is added to the rinse
water when washing.

To obtain a sharper crease in your knit fabrics,
dampen them with a cloth wrung out from a solution
of 1/3 distilled vinegar and 2/3 water.
Place a brown paper bag over the crease and iron.

Excess laundry suds that develop during hand
laundry may be eliminated by splashing a little
vinegar into the second rinse. Follow this with
another rinse in plain water.

Deodorize a wool sweater: Wash sweater, then rinse
in equal parts vinegar and water to remove odor.

After a hem or seam is removed, there are often
unsightly holes left in the fabric. These holes
can be removed by placing a cloth, moistened with
distilled vinegar, under the fabric and ironing.

Unclog steam iron by pouring equal amounts of
vinegar and water into the iron's water chamber.
Turn to steam and leave the iron on for 5 minutes
in an upright position. Then unplug and allow to
cool. Any loose particles should come out when you
empty the water.

Clean a scorched iron plate by heating equal parts
vinegar and salt in a small pan. Then rub the
solution on the cooled iron surface to remove dark
or burned stains.


IN THE KITCHEN:

A mixture of salt and vinegar will clean coffee
and tea stains from chinaware.

Freshen vegetables. Soak wilted vegetables in
2 cups of water and a tablespoon of vinegar.

Boil better eggs by adding 2 tablespoons water
before boiling. Keeps them from cracking.

Marinating meat in vinegar kills bacteria and
tenderizes the meat. Use one-quarter cup
vinegar for a two to three pound roast, marinate
overnight, and then cook without draining or
rinsing the meat.
Add herbs to the vinegar when marinating as desired.

Put vinegar on a cloth and let sit on the back
of your kitchen faucet and it removes hard water
stains.

Vinegar can help to dissolve mineral deposits that
collect in automatic drip coffee makers. Fill the
reservoir with vinegar and run it through a
brewing cycle. Rinse thoroughly with water when
the cycle is finished.
(Be sure to check the owner’s manual for
specific instructions).

Brass, copper and pewter will shine if cleaned
with the following mixture. Dissolve 1 teaspoon
of salt in 1 cup of distilled vinegar.

Clean the dishwasher by running a cup of vinegar
through the whole cycle once a month to reduce
soap build up on the inner mechanisms and on
glassware.

Deodorize the kitchen drain. Pour a cup down the
drain once a week. Let stand 30 minutes and then
flush with cold water.

Unclog a drain. Pour a handful of baking soda down
the drain and add 1/2 cup of vinegar.
Rinse with hot water.

Eliminate onion odor by rubbing vinegar on your
fingers before and after slicing.

Clean and disinfect wood cutting boards by wiping
with full strength vinegar.

Cut grease and odor on dishes by adding a
tablespoon of vinegar to hot soapy water.

Clean a teapot by boiling a mixture of water and
vinegar in it. Wipe away the grime.

Clean and deodorize the garbage disposal by making
vinegar ice cubes and feed them down the disposal.
After grinding, run cold water through.

Clean and deodorize jars. Rinse mayonnaise, peanut
butter, and mustard jars with vinegar when empty.

Get rid of cooking smells by letting a small pot
of vinegar and water simmer on the stove.

Freshen a lunchbox by soaking a piece of bread in
vinegar and let it sit in the lunchbox over night.

Clean the refrigerator by washing with a solution
of equal parts water and vinegar.

Clean stainless steel by wiping with vinegar
dampened cloth.

Clean china and fine glassware by adding a cup of
vinegar to a sink of warm water. Gently dip the
glass or china in the solution and let dry.

Get stains out of pots by filling the pots with
a solution of 3 tablespoons of vinegar to a pint
of water. Boil until stain loosens and can be
washed away.

Clean food-stained pots and pans by filling the
pots and pans with vinegar and let stand for
thirty minutes.
Then rinse in hot, soapy water.

Clean the microwave by boiling a solution of 1/4 cup
of vinegar and 1 cup of water in the microwave.
Will loosen splattered on food and deodorize.

Make buttermilk. Add a tablespoon of vinegar to a
cup of milk and let it stand 5 minutes to thicken.

Replace a lemon by substituting 1/4 teaspoon of
vinegar for 1 teaspoon of lemon juice.

Firm up gelatin by adding a teaspoon of vinegar
for every box of gelatin used. To keep those
molded desserts from sagging in the summer heat.

Prepare fluffier rice by adding a teaspoon of
vinegar to the water when it boils.

Make wine vinegar by mixing 2 tablespoons of
vinegar with 1 teaspoon of dry red wine.

Debug fresh vegetables by washing them in water
with vinegar and salt. Bugs float off.

Scale fish more easily by rubbing with vinegar 5
minutes before scaling.

Prevent soapy film on glassware by placing a cup
of vinegar on the bottom rack of your dishwasher,
run for five minutes, then run though the full
cycle.

The minerals found in foods and water will often
leave a dark stain on aluminum utensils.
This stain can be easily removed by boiling a
solution of 1 tablespoon of distilled vinegar
per cup of water in the utensil.
Utensils may also be boiled in the solution.

Unsightly film in small-necked bottles and other
containers can be cleaned by pouring vinegar into
the bottle and shaking. For tougher stains, add a
few tablespoons of rice or sand and shake
vigorously. Rinse thoroughly and repeat until
clean or determined hopeless.

After cleaning the bread box, keep it smelling
sweet by wiping it down with a cloth moistened
in distilled vinegar.

To eliminate fruit stains from your hands, rub
your hands with a little distilled vinegar and
wipe them with a cloth.

Grease buildup in an oven can be prevented by
wiping with a cleaning rag that has been moistened
in distilled vinegar and water.

Formica tops and counters will shine if cleaned
with a cloth soaked in distilled vinegar.

No-wax linoleum will shine better if wiped with
a solution of 1/2 cup of white vinegar in
1/2 gallon of water.

Stains on hard-to-clean glass, aluminum, or
porcelain utensils may be loosened by boiling in
a solution of one part vinegar to eight parts
water. The utensils should then be washed in
hot soapy water.


IN THE BATHROOM:

Kill germs on bathroom fixtures by using one part
vinegar to one part water in a spray bottle.
Spray the bathroom fixtures and floor,
then wipe clean.

Soap and stain build up can be removed from chrome
and plastic fixtures if they are cleaned with a
mixture of 1 teaspoon of salt and 2 tablespoons
of distilled vinegar.

Clean soap scum, mildew, and grime from bathtub,
tile, and shower curtains. Simply wipe the
surface with Vinegar and rinse with water.

Stubborn stains can be removed from the toilet
by spraying them with vinegar and brushing
vigorously. The bowl may be deodorized by adding 3
cups of distilled vinegar. Allow it to remain for
a half hour, then flush.

Unclog a shower head by unscrewing it, remove the
rubber washer, place the head in a pot filled with
equal parts Vinegar and water, bring to a boil,
then simmer for five minutes.

Corrosion may be removed from showerheads or
faucets by soaking them in diluted distilled
vinegar overnight. This may be easily accomplished
by saturating a terry cloth towel in vinegar and
wrapping it around the showerhead or faucet.

Bath tub film can be removed by wiping with
vinegar and then with soda. Rinse clean with water.


MISCELLANEOUS:

Use vinegar in the steam cleaner to reduce soap
bubbles.

Mix vinegar with linseed oil and use it to clean
your wood.

Clean eyeglasses by wiping each lens with a drop
of vinegar.

Soak new propane lantern wicks in vinegar for
several hours. Let dry before using. Will burn
longer and brighter.

Deodorize the air. Vinegar is a natural air
freshener when sprayed in a room.

Turn a chicken bone into rubber by soaking it in a
glass of vinegar for three days. It will bend like
rubber.

Deodorize a room filled with cigarette smoke or
paint fumes. Place a small bowl of vinegar in
the room.

Remove decals or bumper stickers by soaking a
cloth in Vinegar and cover the decal or bumper
sticker for several minutes until the vinegar
soaks in. The decals and bumper stickers should
peel off easily.

Cleaning windows by using undiluted Vinegar in
a spray bottle. Dry off with newspaper.

Prevent patching plaster from drying by adding one
tablespoon vinegar to the water when mixing to
slow the drying time.

Plastic can be cleaned and made anti-static by
wiping down with a solution of 1 tablespoon of
distilled vinegar to 1 gallon of water.
This will cut down on the plastics' tendency to
attract dust.

The colors in carpets and rugs will often look
like they have taken a new lease on life if they
are brushed with a mixture of 1 cup of vinegar in
a gallon of water.

A mixture of one teaspoon of liquid detergent and
1 teaspoon of distilled vinegar in a pint of
lukewarm water will remove non-oily stains from
carpets. Apply it to the stain with a soft brush
or towel and rub gently. Rinse with a towel
moistened with clean water and blot dry. Repeat
this procedure until the stain is gone. Then dry
quickly, using a fan or hair dryer. This should be
done as soon as the stain is discovered.

Spots caused by cola-based soft drinks can be
removed from 100 percent cotton, cotton polyester
and permanent press fabrics if done so within 24
hours. To do it, sponge distilled vinegar directly
onto the stain and rub away the spots. Then clean
according to the directions on the manufacturer's
care tag.

Sponging away grease and dirt with a sponge dipped
in distilled vinegar will keep exhaust fan grills,
air-conditioner blades and grills dust free.

Leather articles can be cleaned with a mixture of
distilled vinegar and linseed oil. Rub the mixture
into the leather and then polish with a soft cloth.

To loosen old glue around rungs and joints of
tables and chairs under repair, apply distilled
vinegar with a small oil can.

Soak a paint brush in hot vinegar, and then wash out
with warm, sudsy water to soften it up.

Patent leather will shine better if wiped with a
soft cloth which has been moistened with distilled
vinegar.

To add a pleasant scent to a room while at the
same time removing an unpleasant odor, add
cardamom or other fragrant spice to a bowl of
distilled vinegar and place in the warmest corner
of the room.

Varnished wood often takes on a cloudy appearance.
If the cloudiness hasn't gone through to the wood,
the cloudiness can be removed by rubbing the wood
with a soft lint-less cloth wrung out from a
solution of 1 tablespoon of distilled vinegar in a
quart of lukewarm water. Complete the job by
wiping the surface with a soft dry cloth.

Dirt and grime can be easily removed from woodwork
with a solution of 1 cup of ammonia, 1/2 cup of
distilled vinegar, and 1/4 cup of baking soda in a
cup of warm water. This solution will not dull the
finish or leave streaks.

Stubborn rings resulting from wet glasses being
placed on wood furniture may be removed by rubbing
with a mixture of equal parts of distilled vinegar
and olive oil. Rub with the grain and polish for
the best results.

Wood paneling may be cleaned with a mixture of
1 ounce of olive oil and 2 ounces of distilled
vinegar in 1 quart of warm water. Moisten a soft
cloth with the solution and wipe the paneling.
The yellowing is then removed by wiping with a
soft, dry cloth.